Sensei
Examples
Last Updated:
30th May 2004
|
Overview There is currently no Sensei's manual. The only way to learn it is to look at the provided examples. In addition to the examples, looking to the code of SenseiGMNS is also quite helpful to understand the concepts under SenseiDomains, because the GMNS server is itself built on top of SenseiDomains. The directories scripts and scripts.win contain scripts for use under Linux (sh) and Windows, respectively. To use them, it is needed first to edit the file senseiVars (or senseiVars.bat) with the right values for:
All the examples are available for RMI and CORBA. Before running any of the scripts, it is needed to specify the environment to use, using any of the following scripts:
Once that the environment is set, just run the specific script, supplying any desired arguments. Note that the examples will behave differently depending on the configuration. Most of the examples supports the argument '-help' to list the accepted arguments. Random Counter Simple GMS program, does not make use of the SenseiDomains facilities. It requires the GMNS server to be present. This is the best example to understand GMS. It has RMI and CORBA versions, but with separated code (even when some of the files are just the same), and with no GUI. It features an example used on my thesis document to show how to deal with non-deterministic algorithms. The servers must generate unique random numbers and, of course, two different servers must still service different numbers. The example gives numbers from 0 to 4; only after giving all the numbers, it can generate again the same numbers. Because it just shows the GMS functionality, it does not include any state transfer. For this reason, all the servers should be started at same time. The script used to start the example is exRandomCounter. It admits two options (in addition '-help'), and it must be always specified the name of the group (in the GMNS server); the two options are:
The output for a client will be:
One of the servers will produce an output like:
And the other server, that has received the request:
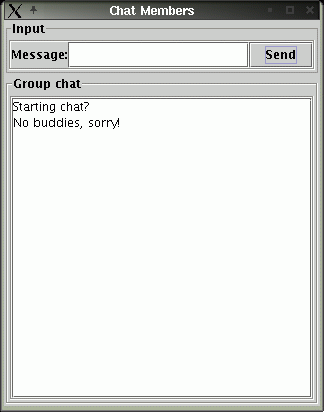
Chat It is as well a simple GMS program, does not make use of the SenseiDomains facilities. It features a Chat program: every client can write messages, that are seen but every other client in the same order. The RMI and CORBA implementation are different. On the RMI case, it opens simultaneously tree identical windows, been possible to write messages on any of the three. Each window (or client) sends as well messages automatically. This program tests the use of several clients in the same process. The CORBA implementation is a genuine Chat program. It requires a GMNS server to be present, where it creates a group called 'ChatMember group'. Any other CORBA client will start automatically 'speaking' with the already existing clients. There is no state transfer support, that is, the new clients do not see the old messages. The script, exChat, does not accept arguments. The GUI looks like:  Performance GMS Last example just focused on SenseiGMS. Although it is listed here as an example, it is in fact written to check the performance of GMS: number of messages that can send or receive on the group. It requires the presence of the senseiGMNS, where it creates a group called 'performanceGMS'. The script, exPerfomanceGMS requires two parameters: the name to be used on the GMNS server, and the resting period: time to elapse before sending the next message. For example:
The output shown is something like:
Exact numbers depend on the number of servers in the group, on the middleware (RMI or CORBA) and on the library versions (debug or optimized). Concurrency This is an application showing some of the features of SenseiDomains, those related to the concurrency mechanisms. It creates members sharing three replicated monitors, which can be locked or used to start transactions. It is also possible to create dynamically new monitors. The only other interaction between members is the sending of messages (queued during transactions). When started with the argument '-help', it shows the accepted arguments:
If 'group' is used, the groups are created through the GMNS. Nevertheless, it can dump the server references to a file, using the 'reffile' argument; in this case, other member can join this one specifying this file with the argument 'connect' It is possible to associate a name to the member's instance, which is shown in the GMNS GUI's interface, if used, and to name the logging file, in case that logging is used. When the script, exConcurrency, is started, it shows first the allowed instructions:
For example:
Domains Test This is the more complex example, showing a huge portion of the functionality embedded in SenseiDomains. On the another hand, it has been created on a chaotic way, adding functionality as its support was included in SenseiDomains and, as the result, the code can be difficult to read. When started with the argument '-help', it shows the accepted arguments:
If 'group' is used, the groups are created through the GMNS. Nevertheless, it can dump the server references to a file, using the 'reffile' argument; in this case, other member can join this one specifying this file with the argument 'connect' Other arguments are deeply associated with the methodology supported by SenseiDomains. These arguments are 'properties', which enable the application to use properties, 'dynamic', which enable the application to create dynamically replicated components, 'coordinator', explained later, and 'mode', which defines the behaviour of the components during the state transfer when there are view changes. To fully understand the meaning of these concepts, please refer to the SenseiDomains section. This example is based on a specific component, which just holds a list of colours. The user can, at any moment, add a new colour (randomly selected) or remove the last one. The program allows to create any number of components, or statically (before joining the group) or dynamically (once the group has been joined). The last case is only supported is explicitely specified. The focus of this test is on the state transfer capabilities of Sensei. SenseiDomains specified five types
of transfer: no transfer, checkpointable, extended checkpointable,
basic state handler and state handler. These components can be created statically on the command line using the arguments '-subgroupsNoST', 'subgroupsChP', 'subgroupsEChP', 'subgroupsBSH' and 'subgroupsSH'. For example, using:
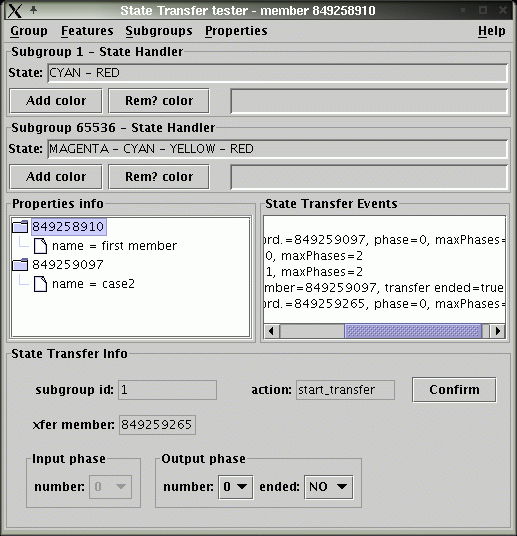
two components are created, one with transfer 'basic state handler', and other as 'checkpointable' The GUI of the application shows the following appearance:  This image shows two components (called subgroups), one static (identity 1), and with dynamic (identity is 65536); both belong to the more complex type of state transfer. Below the subgroups panel, there is a panel showing the properties, including those of the two current members, and another panel showing the state transfer events. The application can run on automatic and manual modes. On manual mode, the window shows at the bottom the state transfer panel, like it is shown on the figure. In this case, the user must answer to all the events received during the state transfer. Note, in this case, that a too slow user input can make the member be excluded from the group. The automatic mode is entered using the argument '--automatic'; in this case, it is possible as well to introduce a delay on the answers given for each state transfer event, using the argument '-delay'. For each new member joined to the group, other member is selected as coordinator to perform the state transfer. The election of this coordinator can be modified using the argument '-coordinator', which accepts three values: 'inf', where internal logic in Sensei is applied, '-user', where every time the user is asked to select a valid coordinator, and '-weight', where load balancing is applied based on the weights given to each member. It is possible to give a specific weight to a member by using the propertie 'weight'. Properties are specified with the argument '-D'. For example:
This example assigns a weight of '4' and the name 'server_ONE'. When the member is created, it does not join the group unless the argument '-join' is used. The user can then modify the member using the GUI, and join later the group explicitely. Note that when a member joins a group, it must define the same properties that the other members in the group. For example, falling to define the same set of static subgroups gets to the exclusion of the member as soon as it joins the group. Tester GMNS This last example is used to check the correctness of GMNS. It requests continuosly from one GMNS server the inclusion of members in one of several predefined groups. This members are terminated randomly, and the GMNS must detect it and remove them from its register, updating the GUI. The test is completed by having several GMNS servers; several clients (testerGMNS) can then be executed against the different servers, to stress the correcteness of the system. The script, exDomainsTest, accepts one argument, '-config', to be able to specify different configuration files and, therefore, different GMNS servers. All the scripts
|