Developing for AIDE requires some training. It is a framework thought to be used by teams of developers. Therefore it is expected to do some training. Experience with Maven is a must. Readers will find after a while that Maven solves elegantly the combination of different technologies that requires AIDE. For a quickstart that shows the AIDE potential, readers are invited to check the quickstart section. A more thorough introduction is introduced afterwards.
Important Information: All the hints given in this page have been cheked with the latest sample-ami-development project version in GitHub.
It is assumed that the software section has been already been read and followed. Before anything, please, make sure every requirement is met. Needed software is the Basic install plus the Basic install for AmI systems.
Get the sample project from https://github.com/Grasia/sample-ami-development by downlading this zip or using git with
$ git clone https://github.com/Grasia/sample-ami-developmentOnce downloaded,
$ cd sample-ami-development
$ mvn clean install
$ cd sample-model
$ ant runSimADLWithoutDisabilities
... a 3D sim is launched that has no Android Devices...
$ sh target/generated/scripts/createAVDsSimAppBodyPosHand.sh
... an AVD is  created  ...
$ ant runSimAppBodyChestNoSymptoms
... a 3D sim is launched together with
 Android devices, which are configured in runtime. The
user shows no tremor symptoms and the device is allocated
at the user's chest ..
$ ant runSimAppBodyPosHandNoSymptoms
... a 3D sim is launched together with
 Android devices, which are configured in runtime. The
user shows no tremor symptoms and the device is allocated
at the right hand ..
$ ant runSimAppBodyPosHand
... a 3D sim is launched together with
 Android devices, which are configured in runtime. The
user shows light tremors this time this makes the user
fall down while sitting at the sofa. The device is allocated
at the right hand ...The full instructions cover a development cycle that comprises a modeling part and a pure Android development one. The modeling part requires only a basic install, while the Android development implies, at least, installing the Android SDK and, at most, installing some Android compatible IDE.
The project structure combines these two aspects too. The basic sample project can be downloaded from https://github.com/Grasia/sample-ami-development by downlading this zip or using git with
$ git clone https://github.com/Grasia/sample-ami-developmentOnce downloaded, the modeling part is allocated in the sample-ami-development/sample-model folder while the AmI software can be found at sample-ami-development/sample-android-devices. It is not mandatory to have both parts combined, but it is recommended since, that way, dependencies across the AmI software and the simulated scenario are easier to track. However these two folder may be developed separatedly too. It is a decision of the project responsible to decide which configuration suites best to the current domain problem.
The modeling part in the downloaded example is accessed through
$ cd sample-model
$ ant edit
This will open a GUI where the modeling activities takes place. Once the model is finished, or the developer just wants to inspect the results,
$ mvn clean compile
$ ant runMySimulation
Where MySimulation is the name of the simulation the developer is currently defining. How to define simulations, the activities of the daily living, and the actors themselves, is something that requires more time and following a more specific tutorial.
There is a complete modeling tutorial available at https://bitbucket.org/escalope/phatsimtutorial-public. Watch that repository to be informed of updates. It may require registering into the bitbucket server. It also requires having GIT installed.
If GIT is not available, you can download it directly from the downloads section of this repository to your computer.
The tutorial has four exercises:
ex0. It is a quick introduction. It shows the basic lifecycle of modeling and simulation. Also, tells how to share the simulations
ex1. It introduces modeling primitives for defining characters and their behaviour. Also, tells how intertwine the behavior of different characters.
ex2. This time, the tutorial focuses in how to model the effects of a disease into the behaviour of a character.
ex3. The example focuses into how to integrate an android device into the simulation. The example shows how to link an app to a device and the device to a particular part of the scenario, characters included.
Inside of each exercise, you will find a pdf with instructions and solutions to the most relevant exercises. The exercise is thought to start from the code stored in the “initialX” folder, where X is 0,1,2,or 3, depending on the exercise. Solutions to the exercise are in the folders “solexXX”, where XX is 0A, 0B,1B,1C…
In the development of the Ambient Intelligence solution, the modeling specification includes information about the role of the Android devices. Android devices in the simulation can be attached to a user’s body or to the furniture. The developer chooses which one is the case. Each simulation scenario can have a different layout of the devices, so the developer can test which one is running better or if there are differences with the allocation. Current version does not permit an easy definition of the physical features of the device, unless the developer has knowledge of how JMonkey development environment works. Anyway, early testing will be sufficient with just accomodating the AmI deployment to a few pre-arranged locations. They are labelled, so the developer can more easily check out available positions.
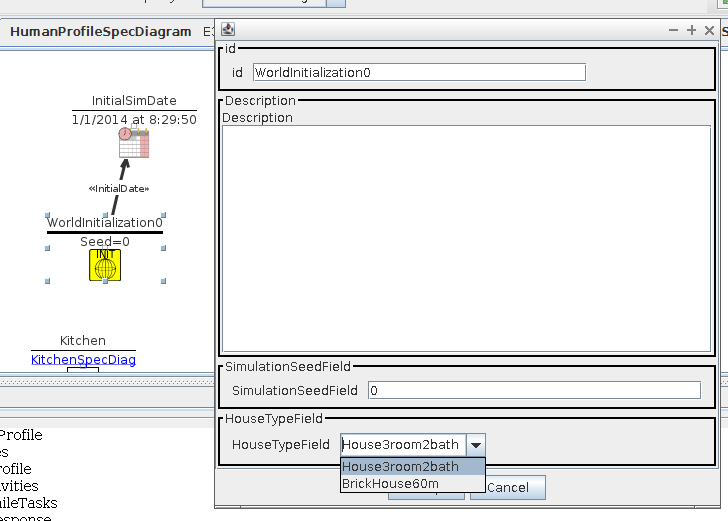
Before attaching devices to positions in the house, a house needs to be selected, first. Available house models are House3room2bath and BrickHouse60m. They can be chosen within the simulation definition through the WorldInitialization entities, just like:
Withing a house model, there are different positions available. To check the positions that can be used, type the following in the console
$ mvn exec:java -Dexec.mainClass="phat.devices.commands.tests.ShowAllObjectIdsTest" \
-Dexec.args="BrickHouse60m"
or
$ mvn exec:java -Dexec.mainClass="phat.devices.commands.tests.ShowAllObjectIdsTest" \
 -Dexec.args="House3room2bath"
The house model will appear similar to the image:
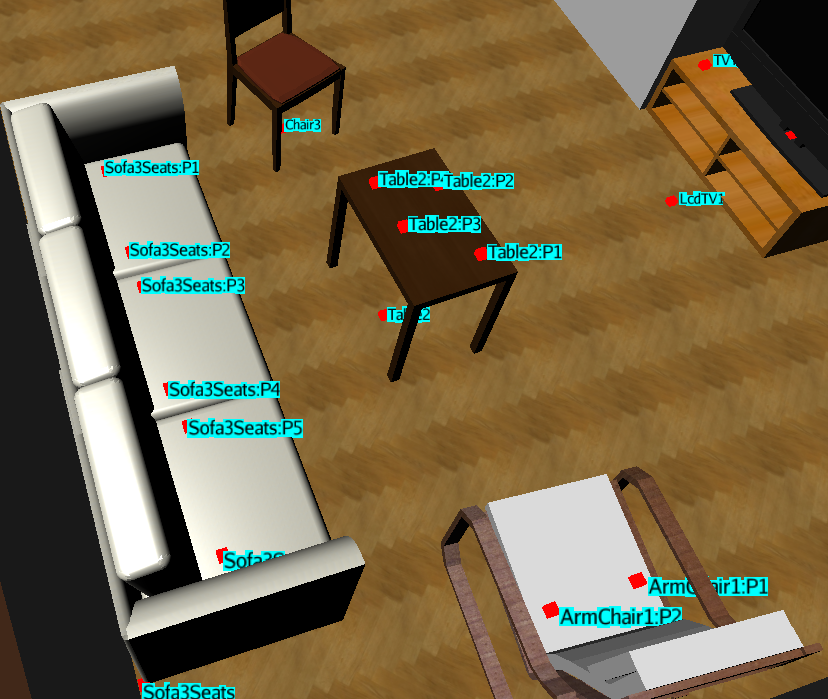
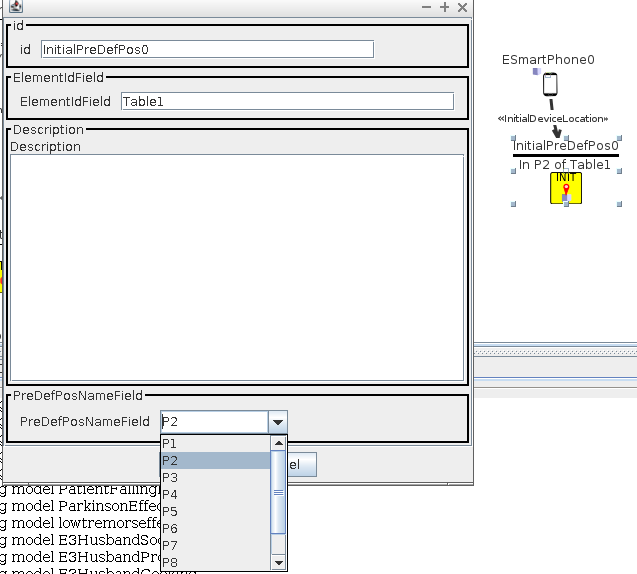
In the deployment scenario, you can choose the house model and the allocation of the device, which is one of P1 to PX.
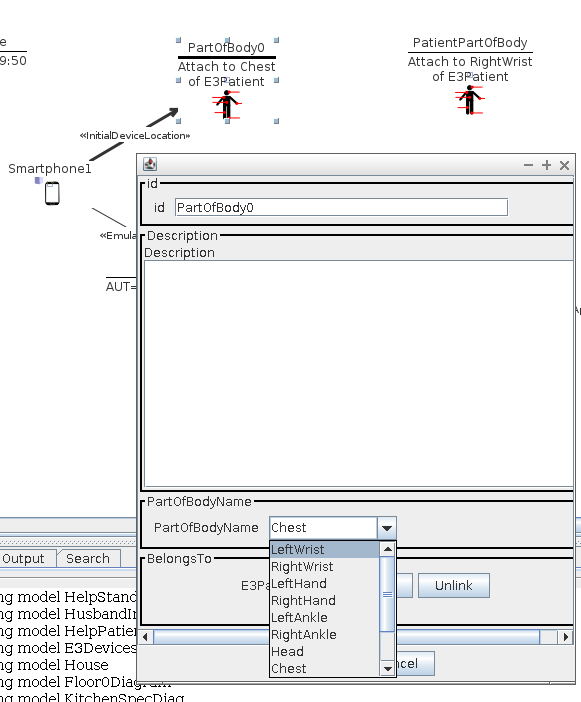
Attachment to a position in the body of the patient is easier:
As a hint, you may have different prearranged positions in your model and connect them to the device if you are not willing to really have separate scenarios and just want to quick test anything. Another alternative is duplicating the simulation diagram content. If you have a diagram that has to be duplicatedcreating another simulation diagram, select all entities of
The Android software development produces a number of apk files which are to be deployed into the different Android devices. The modeling specification indicates which apks are installed in to which device and where is that device in the physical environment. Despite this binding with the modeling part, the Android development is actually independent.
The development of an application itself is not considered here. Android development training can be acquired at the Android site. Applications expected to work with AIDE and to be deployed in the emulated Android machines need to satisfy two basic dependencies:
com.google.android:android. This is a basic platform distribution for Maven that enables access to Android libraries.
net.sf.jali: jali-vapi. This library is from AIDE and enables applications to connect to either the 3D simulation or the real sensors of the device, if there are any.
The integration with them depends on the preferred coding way of the developer. Android development can be realised in different ways, but all of them are assuming a Maven project as starting point. A recommended structure can be found in the sample-android-devices folder from the sample-ami-development case. This structure permits to work with either of the common IDEs for Android while keeping the Maven basic elements. Some instructions are provided at the end of this section.
Adapted elements from the hardware include: the microphone, the accelerometer, the camera. Instead of accesing them directly, the developer has to use the class sim.android.SimManager. This will provide mediators that will derive the calls to simulated hardware or real one. Hence, the developer actually works with these mediators which are: Accelerometers, Camera and Microphone.
Accelerometers with sim.android.SensorManagerWrapper. It must be obtained within the Android activity, since a reference to the activity is needed to determine the real objects. The sim.android.SensorManagerWrapper instance will replicate the elements of its equivalent android.hardware.SensorManager so that its use is transparent. There is an example of use at https://github.com/Grasia/sample-ami-development/tree/master/sample-android-devices/bodyfalldetection, but readers are invited to download the full example to prevent compilation mistakes.
1
2
3
4
5
6
7
8
9
10
11
12
13
14
15
16
17
18
19
20
21
public class BodyPositionMonitoring extends Activity implements SensorEventListener {
private boolean mInitialized;
private SensorManagerWrapper mSensorManager;
private Sensor mAccelerometer;
private final float NOISE = (float) 2.0;
@Override
public void onCreate(Bundle savedInstanceState) {
super.onCreate(savedInstanceState);
setContentView(R.layout.body_position_monitoring);
mInitialized = false;
mSensorManager = SimManager.getSensorManager(this);
mAccelerometer = mSensorManager.getDefaultSensor(Sensor.TYPE_ACCELEROMETER);
mSensorManager.registerListener(this, mAccelerometer,SensorManager.SENSOR_DELAY_NORMAL);
}
...
}
Camera with sim.android.CameraWrapper. In this version, it permits to open the camera, set preview display, release, stop preview, set display orientation, and start preview methods. There is an example of use at https://github.com/Grasia/sample-ami-development/tree/master/sample-android-devices/cameraapp, but readers are invited to download the full example to prevent compilation mistakes.
 ....
 sim.android.CameraWrapper mCamera = sim.android.SimManager.getCamera().open();
 ...
}
Microphone input with sim.android.AudioRecordWrapper. Some constants and static methods have been included to replicate better the internals of android.media.AudioRecord. As in previous cases, instances of this class are obtained through instances of sim.android.SimManager.There is an example of use at https://github.com/Grasia/sample-ami-development/tree/master/sample-android-devices/microphoneapp, but readers are invited to download the full example to prevent compilation mistakes.
1
2
3
4
5
6
7
8
9
10
11
12
13
14
15
16
17
18
19
20
21
22
23
...
class RMSAudioRunnableTask implements Runnable {
@Override
public void run() {
Log.d(TAG, "process()");
// Audio Format = PCM_SIGNED 44100.0 Hz, 16 bit, mono, 2 bytes/frame, little-endian
int frequency = 44100;
int channelConfiguration = AudioFormat.CHANNEL_CONFIGURATION_MONO;
int audioEncoding = AudioFormat.ENCODING_PCM_16BIT;
try {
// Create a new AudioRecord object to record the audio.
int bufferSize = AudioRecordWrapper.getMinBufferSize(frequency,
channelConfiguration, audioEncoding);
Log.d(TAG, "audioRecord...");
AudioRecordWrapper audioRecord = SimManager.getAudio(
MediaRecorder.AudioSource.MIC, frequency,
channelConfiguration, audioEncoding, bufferSize);
....
}
}
...
The maven projects situated under the sample-ami-development/sample-android-devices folder are directly compilable and executable. The sources are allocated in the src/main/java folder in each example. Developers can run the following command to compile, package, and install in the local Maven repository the corresponding apk.
$ mvn clean installSources can be modified with any text editor or an IDE itself. So, all these steps are valid for whatever mean is used to change the sources. The install parameter is important to make the apk available to the 3D simulation. For local development, without 3D simulation, a *mvn clean package can work too and it is faster.
To deploy to the Android device:
$ mvn android:deployThis will send the apk of the project to a connected Android device or an emulated one. To get the logcat from the device, the following can be used
$ adb logcatDevelopers using Eclipse will have to import the project as if it was a Maven project. This will transfer dependencies and other basic configuration elements safely to the Eclipse workplace. If the ADT plugin is installed, the project will be recognised as an Android one and the ADT’s specific icons will appear in the tool bar.
From this point, compiling in Eclipse ADT still works, but deploying may not. Dx errors like the following may appear due to a bad dependency resolution and conflict with AIDE classes:
[2015-10-06 17:27:50 - bodyfalldetection] Dx 1 error; aborting
[2015-10-06 17:27:50 - bodyfalldetection] Conversion to Dalvik format failed with error 1
This forces to perform deployments either from command line using Maven or using the external tools option from ECLIPSE. The usual “run as -> android application” will not work because of this errors. Hence, debugging the application while running inside the device or the mobile phone will not be possible. There maybe ways of connecting the Eclipse with an already launched app, but we have not investigated that possibility.
After launching Android Studio, projects can be imported to Android Studio through File -> New -> Import Project. Then look for the sample-ami-development/sample-android-devices/bodyfalldetection folder and proceed to import. It will process the gradle configuration and then it will create a new Android Studio project with all capabilities enabled.
Also, you can go to the Android app folder and run:
$ gradle installDebugTo get the application installed into a running device (real or emulated) through gradle instead of Maven. If you use Android Studio, be careful with introducing new dependencies. They should be added both to the build.gradle file and the pom.xml file, to make aware both gradle and maven of this new dependency. The file pom.xml has to be always operative since it will be used by Maven to deploy artifacts so that they are available to the 3D simulation.